travel ukulele

This (more) travel-sized ukulele project has been tremendously satisfying! The woodworking part filled me with unbounded joy, and hopefully the music part will be fun, too. The main ‘feature’ of this ukulele is that the tuning pegs (I chose geared ones since they are easier to tune, and I will need all the help I can get) are mounted in the body. This way, the head isn’t needed, making the uke a bit shorter. However, it does make the body unconventional, and probably messes with the acoustics (which I don’t really understand anyway). This is going to be a long blog post – get ready!

As some of you know, I procured a chainsaw a few weeks ago. Its electric, so its not quite as powerful as a gas saw, but still way more going on than me behind a hand saw. Around that time, the walnut tree growing in the front yard was trimmed, special attention to the dead looking branches that overhung the roof. Naturally I was attracted to the stuff that was cut off, and I proceeded to saw some of it up to see if I could help it dry faster and more evenly. I know you can paint stuff on the end to really help control how wood cures and prevent cracking. I didn’t do that. Laziness.

darker wood on the left has been dead for a while, lighter stuff in the foreground is very green

The pieces that had been dead for a while looked almost ready to work. So after waiting a few weeks (and after sharpening my jointer knives) I ran the first piece over the jointer and was not disappointed.

jointers are magic. Also trees.

The first thing I wanted to cut was the book matched pieces for the front sound board. I think the spindle on the table saw wobbles slightly and not everything is square, so the cuts didn’t come out that smooth. Also, the saw kerf is pretty wide and the log diameter is pretty small, so the book match pattern isn’t perfect – pretty satisfactory for my first stab at a book match though!

book match blanks
book match blanks


clamping the book matched pieces, this made me keenly aware that I could use some bar clamps

Next I turned my attention to the neck. I ripped and thickness sanded a wide strip of maple to be sandwiched between two thicker pieces of walnut.

neck sandwich
neck sandwich

The result is a bright white line, that I think provides an attractive contrast to the walnut.

worst oreo ratio ever

Since the wood had been dead for a while, some of it had some insect damage. I was really careful with how I arranged my neck sandwich with the hope that the insect hole areas would eventually be cut away.

can you spot the insect tunnels?

While the glue for the neck was drying, I cut the pieces for the body. Because I wanted to mount the tuning pegs on the body, I knew the body sides would have to be quite thick.

body pieces
body pieces
just enough vises
just enough vises to get the job done
my alignment of parts during gluing was far from perfect, but that's okay since I'll just trim everything with the table saw now
my alignment of parts during gluing was far from perfect, but that’s okay since I’ll just trim everything with the table saw
trimming the bottom of the body
trimming the bottom of the body, the sacrificial plywood behind the part helps limit tear out.

Now back to the neck. I forgot to take photos of the tenon being cut with my tenoning jig, but that happened (you can see part of it on the end of the neck facing away from the camera in the photo below).

roughing out the neck profile on the bandsaw
more rough shaping
more rough shaping on the table saw

With the profile of the neck roughly shaped, I glued on a thin piece of cocobolo which will later serve as a visual accent for the end of the neck, and also provide a small thickness increase at the very end of the neck, which I find to be a pleasant thumb detent.

gluing on a thin piece of cocobolo to the very top of the neck where the head stock usually attaches

Finally we commence some truly satisfying woodworking when the whittling begins. Some of you may recognize this knife from a previous build.

carving stuff
carving stuff

After getting the rough shape with a knife, I smoothed things out a bit with a fine rasp.

shaping the neck
shaping the neck

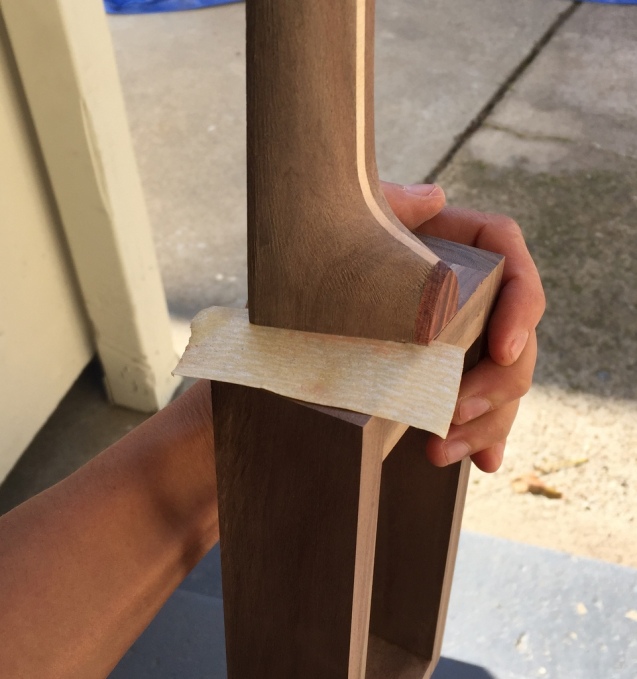
To compliment the cocobolo accent at the top of the neck, I added one on the heel. I roughly cut it to shape before gluing it on.

glueing on a cocobolo heel cap
more carving to shape the heel cap
carving the other end of the neck
neck in-progress

While the heel cap glue drying, I glued some blocks into the body to form the slot that the neck tenon will glue into. I’m assuming the glue will be enough to hold the string tension on this particular uke. The piece of plywood in the middle is cut and shimmed to be the same width as the tenon.

gluing in blocks to form the slot that the neck tenon will glue to

And because I was pretty sloppy with gluing in those blocks, I trimmed the body again with the table saw.

trimming the body
trimming the body

The tenon cut wasn’t perfect, so I very patiently sanded the shoulders a little, using the uke body as a guide.

sanding to fit
sanding to fit

About this time I made a little test block to see how the tuning pegs would fit into the sides. I think the pegs I picked were too short… To compensate, I thinned the sides of the body (shown below is after thinning, the block I am holding is the original thickness).

thinning the sides
after thinning the sides

In order to have tuning pegs in the body, the strings have to wrap around the end of the body and route into the body. To reduce friction, I made a smooth mandrel for the strings to wrap around. I started by rounding over a piece of cocobolo on the router.

rounding a piece of cocobolo as a string mandrel

Next I put some scallops on the end for decoration using my roommate’s mill. I guess I could have carved this, but the mill was right there…

scalloping the ends on a mill

Around this time, the test fits got really exciting!! You can see the more or less finished mandrel on the right. Next to it is a ready-made rosewood fretboard that I bought off eBay. They don’t have the greatest fit and finish (some of the edges on this one are too heavily chamfered), but for the most part, they are okay. $7 seems like a good tradeoff to avoid lots of tedious measuring and sawing (at least for my first stab at this luthier thing).

test fit!
test fit!

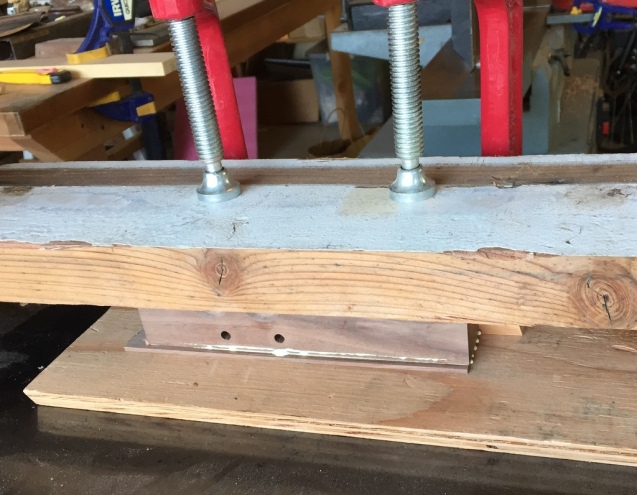
Next I laid out and drilled the holes for the tuning pegs. I was careful to back the hole with some sacrificial material during drilling to minimize tear out.

drilling holes for tuning pegs

To provide clearance for the tuning pegs to turn, I needed to scoop out some material on the sides. I knew I’d end up hand carving part of it, but I removed a lot of material with a forstner bit first.

drilling the scoops for the tuning peg paddles
laying out the rest of the scoop shape
carving the rest of the scoop, sharp tools sure are nice for this step!

Shortly after sanding the tuning peg scoops, I cut the sound board to size (a little big actually), and glued it to the rest of the body assembly.

gluing the sound board to the rest of the body

While that dried, I again turned my attention to the neck assembly. Turns out the walnut wasn’t totally dry. After a few days, there was a slight bit of unevenness in the fretboard gluing surface, so I sanded it down. Fingers crossed that the extra moisture is pretty minimal and doesn’t cause any problems in the long run…

sanding the fretboard gluing surface flat

About this time I realized that I had forgotten to cut the nut slot while the sides of the neck were still square. Oops. So I set the miter jig on the table saw using the neck itself as a guide.

setting the angle for cutting the nut slot

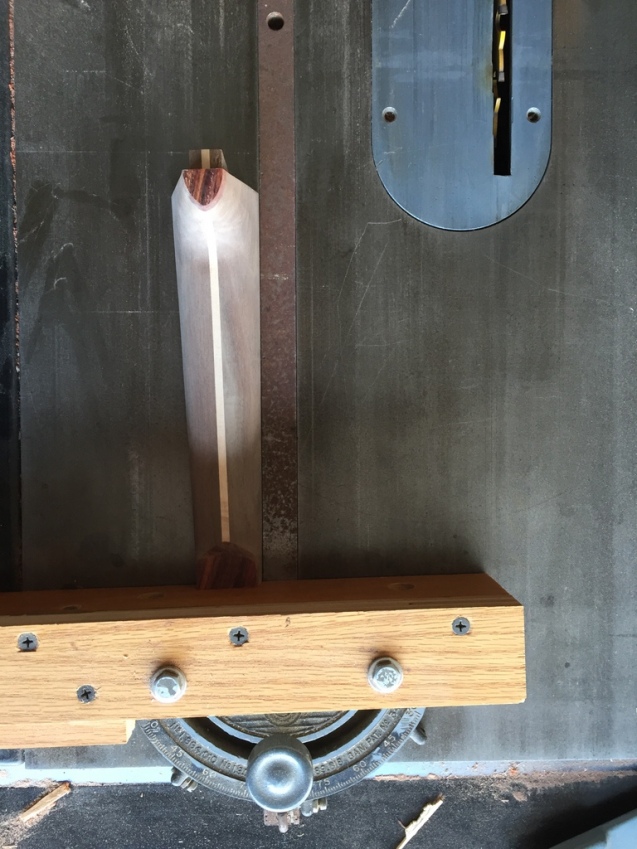
A test piece showed this actually works out pretty well, so here goes the real thing!

no turning back
no turning back
slot for nut
slot for nut
gluing in the nut, probably could have used way less glue...
gluing in the nut, probably could have used way less glue, or maybe none at all…

Next I glued the neck to the fretboard so that I will be able to sand the edges of the fretboard perfectly flush with the edges of the neck.

gluing fretboard to neck

Again as the neck dried, I turned my attention back to the body and trimmed the edges flush.

trimming the edges of the sound board

While planing the edges, I got a little sloppy and took out a pretty big chunk.

sloppy planing
sloppy planing

To fill the unsightly nick, I found an appropriately sized wood chip and used a generous amount of glue. The resulting fix is surprisingly good. I think most people won’t find it unless they are looking for it.

filling the nick with a wood shaving

After sanding the edges of the neck flush to the fretboard, the width of the neck had naturally decreased – so much so that the neck now felt too thick, so I shaved away some more material and sanded smooth again.

adjusting the back curve shape of the neck
drilling holes for the strings to pass through
quick sanding mandrel
quick sanding mandrel to touch up the insides of the holes
gluing the cocobolo mandrel in place
finally! neck and body joined!!
chamfering the neck tenon slot
chamfers on the neck slot were key to a tight fit
test fitting the tuning pegs, looks pretty good

Part way through the project, I decided I wanted a removable back cover. This would allow me to still access the tuning pegs when I needed to, but hide them for the most part. I think it might also make it a bit louder?? I don’t know, I honestly can’t tell.

cutting rails for the back cover

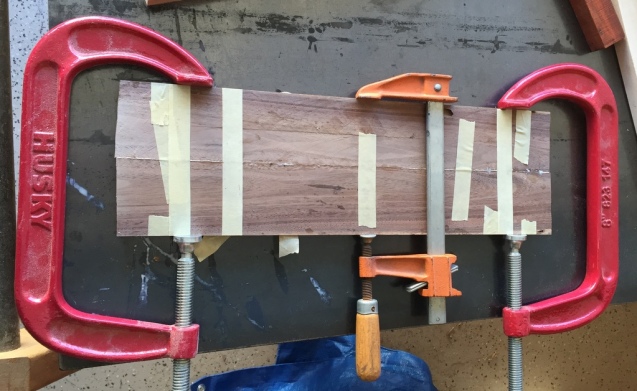
Its crazy how many clamps are needed to glue something so small. I intentionally made the frame larger so that I could carefully sand down and ensure a tight fit with the ukulele body.

gluing the back cover
gluing the frame for the back cover

I used what was left of my book match from the soundboard to do the back as well.

drilling a finger hole for removing the back cover
drilling the sound hole - a momentous moment!!
drilling the sound hole – a momentous moment!!

Finally, I started filing notches for the strings and tuning the height of the bridge so that the string would the the right distance from the frets. It took quite a bit of iteration and time, but I knew it would be bad to overshoot it.

filing notches in the nut for the strings

Finally, after lots and lots of sanding, I was ready for finish. I opted for several layers of Tru-oil (similar to Tung Oil) for its simplicity in application and the naturalness of the feel.

applying Tru-oil
applying Tru-oil (its cool that it balances like this)
the scoops came out great!
the finished product!!!
backside
backside
heel and neck
heel and neck
top of the neck
top of the neck
with tuning pegs installed
view of the inside
view of the inside, for now the back cover is just friction fit

It’ll take me forever to learn how to play this, but at some point a video will be posted. Stay tuned…

**May 28, 2017 – finally wrote about the updates that I made on this uke to make tuning easier**


Posted

in

by

Comments

28 responses to “travel ukulele”

  1. Ian Avatar

    Those accents are great, it’s really pretty! I’ve been using rosewood as an accent for walnut, think I’m going to give this a try as well.

  2. David Avatar
    David

    Love the design and the placement of the tuners. How does it sound? And how does it play?

    1. aqian Avatar

      It is not as loud compared to a regular sized uke, but I find it sounds very sweet? This will be better illustrated when I put together a video of it side by side with another uke. I find it tricky to play since its almost too small to play and hold at the same time, but I’m just learning to play, so that’s probably a bigger reason.

  3. Jimmie Leo Nix Avatar

    I am doing research to build my grand daughter a ukulele .Your presentation was very well put together and quite informative. Not making one before this has inspired me greatly. Thanks you so much.

    1. aqian Avatar

      excellent! thank you for reading, good luck on your build!

  4. […] you thought my other ukulele blog post was long, take a deep breath before reading through this one. Also, this one is super […]

  5. […] is a long overdue (as usual) update to the travel ukulele I made a year and a half […]

  6. […] Amy’s resultant ukulele is, in my opinion, simply stunning. I saw her walk by, across the room, one day and did a double take. I had to go and ask her about it, and was truly impressed when she explained that she made it herself. You can follow along with the entire build on her blog. […]

  7. Gary Hanson Avatar
    Gary Hanson

    Amy, How are you? I have read your blog I find it very interesting. My question is do you have the measurements for those of us that would like to create this beautiful piece of art?
    Thank you
    Gary Hanson

    1. aqian Avatar

      Hi Gary, Sorry, this is still on my list, but I haven’t gotten around to it yet. I’m thinking about making the measurements at a concert scale though, because that would make it easier to play. Is that still useful to you?

  8. […] Download Plan More @ amymakesstuff.com […]

  9. Joseph Yambao Avatar
    Joseph Yambao

    Could i have the measurements for each of these steps? I really want to build this but i need the specific measurements. Thank you and awesome build!

    1. aqian Avatar

      Hi Joseph, thanks for reading! I haven’t had a chance to get the measurements all together, but I’ll post them here and on YouTube when I’ve got them finished!

  10. […] Qian of AmyMakesStuff.com documented her really gorgeous build and […]

  11. […] what to build from the trimmings of the walnut tree in her yard, [Amy Quian] decided to build a headless travel ukulele. [via […]

  12. […] des Walnussbaums in seinem Garten gebaut werden muss, [Amy Quian] beschloss, eine zu bauen Reise-Ukulele ohne Kopf. [via […]

  13. […] what to build from the trimmings of the walnut tree in her yard, [Amy Quian] decided to build a headless travel ukulele. [via […]

  14. […] what to build from the trimmings of the walnut tree in her yard, [Amy Quian] decided to build a headless travel ukulele. [via […]

  15. […] construire à partir des parures du noyer de son jardin, [Amy Quian] a décidé de construire un ukulélé de voyage sans tête. [via […]

  16. […] what to build from the trimmings of the walnut tree in her yard, [Amy Quian] decided to build a headless travel ukulele. [via […]

  17. […] what to build from the trimmings of the walnut tree in her yard, [Amy Quian] decided to build a headless travel ukulele. [via […]

  18. […] from the trimmings of the walnut tree in his backyard, [Amy Quian] determined to construct a headless travel ukulele. [via […]

  19. […] what to build from the trimmings of the walnut tree in her yard, [Amy Quian] decided to build a headless travel ukulele. [via […]

  20. […] what to build from the trimmings of the walnut tree in her yard, [Amy Quian] decided to build a headless travel ukulele. [via […]

  21. […] what to build from the trimmings of the walnut tree in her yard, [Amy Quian] decided to build a headless travel ukulele. [via […]

  22. Jonathan Hovey Avatar
    Jonathan Hovey

    Really nice!!

Leave a Reply