I’ve always wanted to make custom knives. When I finally deemed my circular saw blade too dull to use, it seemed like a great opportunity. The steel used in saw blades usually has high enough carbon content to be hardened, so hang on to them! (or mail to me :D). I traced my blade pattern onto the saw blade and rough cut it with an angle grinder.
For the handle I used a scrap piece of hardwood that I’ve had for a while. I think its bloodwood?

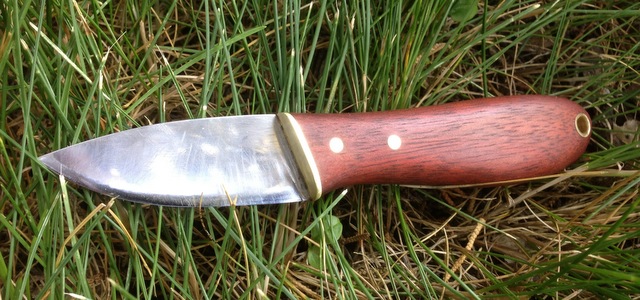
I wanted to use a small brass plate between the blade and the handle (what is this part called? Its not really a guard, not really a bolster). I didn’t have any brass plate, but this arcade coin I found was perfect for the job after flattening the faces on a belt sander.

A slot is cut by drilling a line of holes with diameter slightly smaller than the thickness of the blade. The holes slowly become a slot with careful filing.

The same technique of drilling small holes and filing is used to make the slot for the knife tang. This is considerably trickier due to the depth. You can also grind a hacksaw blade to fit, and use that to enlarge the hole, but it will still take patience.


To file the bevel on the blade, I used the setup shown below. A file is attached to a sturdy stick of wood by a screw on one end and a clamp on the other (this is the skinny piece of wood laying diagonally in the photo). One end of this stick rests on a perpendicular piece of wood (the orange clamp is touching it). The height of this piece, and its distance from the blade determines the taper angle. The file of course contacts the knife blank. Also, you can see a little angle iron which is preventing the file from wandering too far down the tang.


Now we’re ready to heat treat, so I need a forge. I found a propane torch alone let’s too much heat escape and cannot heat evenly. Plus, a simple forge is surprisingly easy to make. There are tons of articles online showing how to make one, so here’s another:
Start with 2 K2300 bricks. They are really soft and easy to shape. I clamped them together and used an already dull spade bit to drill the forge opening hole.

I added a cavity to better contain the heat. One inch of material around the cavity seems to be the internet-recommended insulation thickness.

Its really easy to chip away at this stuff with a screwdriver. I also found that a washer was perfect for smoothing out all the screw driver gauge marks.

I used a 1/2″ spade bit to drill an opening for the torch.

I hear these don’t get too hot, but better safe than sorry. Some steel angle iron is riveted together to make a stand (a welder would have been nicer though!). You can also see, I wrapped the two bricks together using some steel wire. The internet said this was a good idea, since the brick tends to crack over time, and the wire will keep it together. I am assuming the cracks are more a gradual development and less a dramatic failure???

Below is the basic setup, although I ended up changing torch heads since the one below didn’t seem to be burning all the propane (I could smell some). I am guessing it needed more air intake? Anyhow, I ended up buying a Benzomatic all-brash Basic Pencil Flame Torch, which has little air intake holes closer to the end of the torch than the one in the photo below. That seems to have done the trick. (Fun fact: that torch was $12.96 at Home Depot, but the same torch WITH a can of propane was only $12.97).
I used a 1/4″ thick piece of scrap steel over the opening, this seems to help retain heat.

I’m pretty sure I didn’t do the heat treatment well, but from test filing it seems to at least be a little harder than how it started. Anyhow, I cleaned it up with some sand paper til it was shiny again. I was afraid to drill into the tang directly, for fear it would be too hard, so I decided to try and anneal it. It worked for the most part, but I did accidentally overheat the bottom corner of the blade. oh well.

Next I covered the blade with tape, and epoxied everything together. Some scrap wood and threaded rod make for a great clamp.

When the glue had cured, I drilled two holes for brass pins in the tang, and a 1/4″ hole that will be drilled out for a lanyard. The next part is definitely my favorite – shaping the handle.

A belt sander is definitely your best friend for shaping the handle. I also used a combination of rasps, files, and sandpaper. You can see below that I didn’t really polish out all the scratch marks from coarser grits, I was just too impatient to get it done. Surprisingly however, I did manage to get it really sharp! Newbies, make note, a razor sharp blade is within your reach! I was able to shave hairs and skive leather with this.

Seems like the secret weapon to a nice edge is a strop. I took a strip of scrap leather, and rubbed some buffing compound on it. You can tie or clamp one end to something sturdy, and hold onto the other end.

yay, homemade tools are the greatest!
Leave a Reply
You must be logged in to post a comment.