Honda Element Camper – Bed

I finally finished the 2D drawings and 3D model of my Honda Element Camper Bed. For background, this earlier post give a full tour of the camper and some of the design goals I was trying to balance. While this design provides all the details that tailor it for an Element, I think it could also be useful for any other vehicle.

If you end up using these plans in any way, I would LOVE to hear about it!

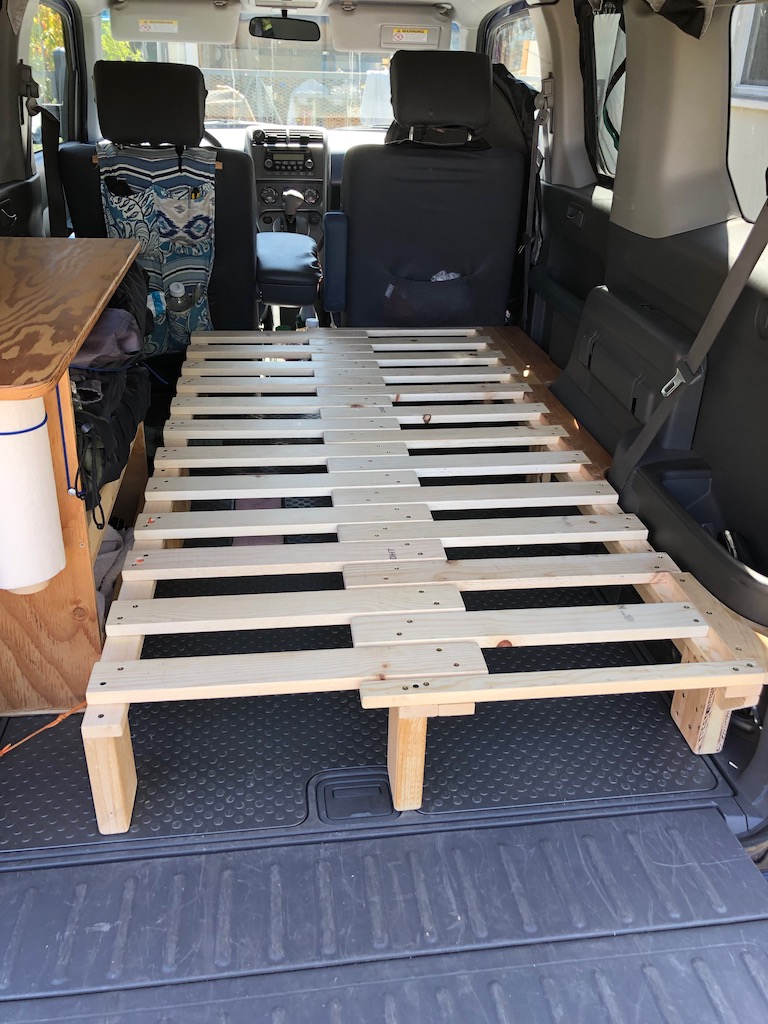
Compared to my previous bed, the design for this one has several changes to make it easier to build. The main one is that I used off-the-shelf lumber. When I was building the first one, I had a bunch of wood for a heavy duty pallet that I ended up ripping into smaller boards on the table saw. The results is that all the dimensions of all the boards were a little non-standard.

The previous bed also had small gaps between all the slats, which led to a lot of fine tuning and sanding to get the pull-out sections to slide smoothly. For this new design, only 3 slats slide against each other for each pull-out section, and the rest have much larger gaps, which resulted in zero fine tuning – phew.

PastedGraphic-3-1
CAD assembly of the full bed. The blue and green shapes are the custom shapes that tailor the bed to an Element.
PastedGraphic-2-3
expanded bed

Here is the actual STEP file: Honda Element Bed v26 AmyMakesStuff.step

Here is the 2D assembly drawing: Honda Element Bed Drawing v9 AmyMakesStuff

Honda Element Bed Drawing v9 AmyMakesStuff
The assembly drawing provides a lot of key dimensions. For any that I missed, feel free to reference the 3D model.

The last page is a full cut list you can use to plan out how much and what kind of material you need to get.

Honda Element Bed Drawing v9 cut list AmyMakesStuff
Its super satisfying to cut a big pile of pieces and then just non-stop assemble!

For the Honda Element specifically, here are the 2D 1:1 scale PDFs of the two funny shapes that fit the contours of the vehicle interior: Honda Element Bed TEMPLATE v1 AmyMakesStuff For tips on how to print them out, check out the video I made for how to print out full-scale templates for the my Element shelf/desk unit.

IMG_4042
installed
IMG_4043
expanded
IMG_4044
glamour shot of the slats
IMG_4048
underbelly
IMG_4050
room for 2x Sterlite 28Q (27L) Tupperware. I usually keep food + cooking stuff in one and have one for spare gear/clothes.
IMG_4045
curve fitting 1
IMG_4046
curve fitting 2
IMG_4047
curve fitting 3

Full in-process build video:


Posted

in

by

Tags:

Comments

72 responses to “Honda Element Camper – Bed”

  1. Mark Aramaki Avatar

    Hi Amy. Your skills, mindset and execution impress me. If you ever think about working in the woodworking industry please get in touch. Thanks and continued success!

  2. Mike McKenna Avatar
    Mike McKenna

    Awesome job Amy on all levels. I appreciate you sharing detailed plans with cut list, saving me a lot of time in trial and error work. Thank you

  3. Joe McD Avatar
    Joe McD

    Nice design. A little heavy though. However weight is difficult to avoid. In the past, I would modify a camping cot, by using material and 4-inch soft foam rubber, and 3/8 plywood panels. Cut the panels to fit the cot or area of interest. Then staple the material around the foam rubber on the plywood panels. Very cheep and easy to do. The current ones I am using are over 10 years old.

    1. Malarz Avatar
      Malarz

      Thank for you for so generously sharing your ideas and plans.

  4. JerZYTattoos Avatar

    Amy thank you SO MUCH for sharing your knowledge! I had found your page awhile back while searching for Element Micro camper builds and was planning on trying to make this just by the video. I am planning a 48 state trip in the next few years and I know this will make it much easier. I looked it up today while at the lumber store and low and behold you posted the most AMAZING and easy to follow build with a supply list no less. I have almost all of the pieces and I’ll be attempting creation in the next few weeks. I’d love to know your camping tips for long trips too and an idea of what works best for cooking 🙂

    1. aqian Avatar

      Woo!! Exciting build and more exciting trip! Really the longest trip I’ve ever done was only about 2 weeks and that was years ago, so not sure I have too much advice to share. I’ll have to think about that. For cooking, I am a huge fan of the Coleman bottle top stove because they work so well and break down very small. I’ve never needed more than one burner and try really hard to make only one pot dirty if I cook at all. I find I’m able to keep that stove, a small pot, plenty of utensils, plates, cups, and even a bunch of oatmeal all in one big Tupperware.

  5. jerzytattoos Avatar

    Amy thank you SO MUCH for sharing your knowledge! I had found your page awhile back while searching for Element Micro camper builds and was planning on trying to make this just by the video. I am planning a 48 state trip in the next few years and I know this will make it much easier. I looked it up today while at the lumber store and low and behold you posted the most AMAZING and easy to follow build with a supply list no less. I have almost all of the pieces and I’ll be attempting creation in the next few weeks. I’d love to know your camping tips for long trips too and an idea of what works best for cooking 🙂

  6. Mark Chan Avatar
    Mark Chan

    hi,Amy,i saw your video many times,never saw the lady did it like you,you are great the woodworker,i proud of you.thank you for share. Mark Chan

  7. NOKI Avatar
    NOKI

    I love this design.. I used to have a honda element and I have been trying to cinvertbit into a camper.. would love to contact you next time I get another ‘camper’ vehicle:) you are awesome!

  8. Emily Johnson Avatar
    Emily Johnson

    Dude this is awesome! I’m going to try and use your design in my 2005 CR-V, I will probably need to reshape the custom pieces though. I’ll let you know how it goes!

    By the way, what mattress did you use for the bed cushion?

    1. aqian Avatar

      Thanks for reading, Emily! I look forward to seeing your update! I used this mattress, but it looks discontinued now on Amazon: Zinus Memory Foam 4 Inch Mattress. I’m sure you can find something similar from somewhere else. The important point is to use an actual mattress, not just a foam topper. A mattress will have a stiffer foam at the bottom that will prevent you from compressing the foam all the way. I used a topper for a while and could always feel the bed frame underneath. Good luck!

  9. Nancy Avatar
    Nancy

    Hello Amy! I’ve cut out all my pieces and I’m ready to assemble but I ran into a small problem. I cut 10 of the long 21″ slats but when I look at the finished pic I’m counting 11. Same with the 20″ except instead of 13 I’m counting 12 in the pic.
    I’m probably missing something 😥 this is my first attempt at building anything from scratch and I’ve watched your video a dozens of times. You are AMAZING!

    1. Nancy Avatar
      Nancy

      And thank you very much for the plans!

  10. Nancy Z Avatar
    Nancy Z

    Hi Amy, I DID IT! I can’t tell you how much I appreciate your generosity in sharing the specs for your bed design. I did run into a few bumps, but that was more “operator error” than anything. I couldn’t get the legs to stay on so I just used L brackets and that worked fine. It’s nowhere near as beautiful as yours but it works! I suffer from arthritis in my knees and back but I love to take trips to the mountain. This setup will allow me to move around without putting to much stress on my joints which means less pain more trips. 😁

    Thank you, thank you THANK YOU!

    1. aqian Avatar

      Nancy, you rock!!!!! It makes my day to hear that you built this. I’m wishing for you many wonderful mountain adventures!

  11. Topher H Avatar
    Topher H

    This is SUCH an amazing build. I have been interested in building a stowable bed platform in a smaller vehicle, and was always perplexed at the use of so many builds that used big solid plywood sheets. Beds, especially in enclosed spaces, don’t do well on flat platforms! They retain heat and moisture and are too stiff. You have solved it with the sliding ventilation slats!

    I was considering adapting the design to something that uses both expandable slats as well as a hinged sections so that it not only interlaces for space saving as you have built, but also folds in half over top of itself so it can be stored in the cargo area easily. Kind of like folding a piece of paper in half and then in half again. Your slats are the first fold… Hinges in the center could be the second. It would take up a quarter of the floor space!

    You have already split the slats into two moveable sections. It seems like separation of the “fixed” portion into two independent halves that could would be a trivial change, though it may result in a loss of structural integrity. Or you might hit the ceiling…

    Would love to hear your thoughts. Keep up the amazing work.

    1. aqian Avatar

      Glad you enjoyed the build! I end up using the space below the bed for storage containers, so I have no incentive to collapse the bed further as this further reduces my storage volume. Also, at some point I had a bed setup with some platform sections that folded out on hinges, and I really disliked that so much space had to be clear to allow the hinging swing motion. I find that with this current setup, I can still deploy or stow the bed without really cleaning up whatever is on top of the bed. Every use scenario is different though! Curious to see what you decide to build!

  12. Bo Sun Avatar

    Hi Amy, thanks for sharing the drawings of your Honda Element Camper Bed.

    I wanted to create a modified simplified build w/o the curve fitting pieces and using stock 1×2 for Rails. I also wanted to make the “exploded” bed a total width of 48″, in order to stretch all the way across the interior width of the Element, as seen in this video: https://youtu.be/_2N1_l32OQA?t=104

    Attached STEP & SW2019 files: https://drive.google.com/open?id=1Wkx-T31Bx2d1Mwq1VY79MJ6xbcZScmZA
    Animation: https://drive.google.com/open?id=1hGLb7D2x6DDVaY8bpyPemUuNRFeEM8ev
    (This is just preliminary, I will fill out the other slats, including the guide slat(s), later on).

    My question is, do you think using stock 1×2 in the Rails would be strong enough to hold up a significant amount of weight (~300 lbs)? Or would you recommend using 1×3 (or Ripped) for the Rails for strength, which would probably require the collapsed bed to be > than it’s current width of 28″?

    Note that I made the legs at least 14″ tall because of wanting to fit a ENGEL 25 hard cooler underneath the bed: https://www.engelcoolers.com/engel-25-hard-cooler.html
    This would give about 31″ clearance from the bed frame top to the interior roof, or about 27-28″ with a mattress. Do you think this would be too little head clearance space?

    Thanks again for sharing your detailed drawings!

    1. aqian Avatar

      If I am understanding your CAD animation correctly, you are showing 4x 1x2s spanning the length of the bed. If this is all you plan to have (and no additional legs in the middle) I definitely don’t think this is enough to support 300 lbs. You might get lucky by choosing lumber with optimal grain, but even then, you will definitely feel the flex. I am managing to avoid this problem with the extra set of legs in the middle. 1×3 will make it better for sure, but maybe the best test for you will be to get two 1x3s (or 1x2s) and put 300 lbs near the middle to see if that feels good to you.

      Previously I did have a setup that had about that much head room. It was okay. I much prefer being able to sit up all the way now. I guess it depends on how tall you are. I prototyped headroom by just sitting on chairs or boxes of the representative height.

      1. Bo Sun Avatar

        Of course, that’s the reason had the middle leg(s) as well!

        I thought I could use 1×2’s for the Rail pieces because they are only 0.375-0.5″ off from the 1×3 Ripped pieces you have listed under your Cut List. Was there a reason you split the moving bed into 2 pieces, instead of just having 1 moving piece?

        Did you do any sort of structural analysis/tests before deciding to use 1×3 Ripped, or you just hoped it would support the weight? Do you think it would be OK to use 1×3’s for the center Rail pieces (where most of the weight is distributed on the bed), and get away with using 1×2’s for the two outer Rail pieces?

        Thanks for your inputs.

        1. aqian Avatar

          Oops, I must have missed it in the animation!

          I split it so that I have the option of fitting a big cooler when I am traveling alone. Also, in general I think splitting it makes them easier to slide. Less binding.

          Originally I used something a lot closer to 1×2 for all the rails and I could feel it flex a little bit. Again, this may be very dependent on the exact pieces of wood you use. I think your idea of using 1x3s in the middle and thinner in the sides could work. Even better is if you put the side rails on their edge so they are even stiffer. You could even go with metal tubing and definitely be fine.

      2. Bo Sun Avatar

        Hi Amy, not sure why I’m unable to reply to your latest comment.

        As recommended, I added the middle legs, along with using stronger 1×3 for the “center” Rail pieces:

        New animation (w/ middle legs): https://drive.google.com/open?id=1G5QrgXnDw4NAdMOEf2HRspzDmH3QSVTh

        Dimensions of center & side Rail pieces: https://drive.google.com/open?id=1m03JZdOba-4BXlk14Sy1vCG7LUNEyKpn

        Hopefully this will be strong enough with the slat pieces overlaid on top? I’ll also try your tip about using 1×3’s rotated 90° along its vertical axis for the side Rails for stiffness.

        Thanks!

      3. Bo Sun Avatar

        Hi Amy,

        The model has been updated with all slats filled, and separate colors for each of the 2 pieces (red & blue). Dimensions are 66×48″ LxW overall: GIF below:
        https://imgur.com/a/SaoJDDK

        Thanks.

  13. Mark Lane Avatar
    Mark Lane

    Hi Amy – just ran across your video and plans. Really nice – great job! And thanks for all the detail you provided to all of us. In the video, you were rounding off the edges of the slats and other wood pieces with what tool? A block planer of some sort? Could you share what you used and how effective it is. Many thanks!!

    1. aqian Avatar

      It is a home made round over plane! This is how I made it: https://youtu.be/NOGKEgTpBN8 I like it a lot. I find it very fast to use and get pretty good cuts with it. I do get some tear out of the wood fibers so there is definitely room for improvement. But so far much better than sanding.

      1. Mark Lane Avatar
        Mark Lane

        Thanks so much for sharing!

  14. Kevin Shea Avatar
    Kevin Shea

    Exactly what I needed! Looking for the perfect setup to convert my Element to a overnight mini RV and this is it! Small counter space to prepare food, a place for a laptop, storage…you thought it out well! . The place I’m going to is related to my work and it is 2:22 minutes drive each way. I just cant see myself driving to and from as a daily commute and only need to cover this work location 25 days out of the year. I’ll just boondock or stelth camp! I have a solar panel not being used and a power inverter. Probably add a flat screen TV (free repaired from ewaste pile) Add an TV antenna and receive free broadcast TV. (It just so happens that transmission broadcast antenna are with in 10 miles! Might as well have some amenities! The problem is how to stay cool in the warn humid weather. I think heat is easier to conquer with a small propane heater or diesel truck heater and also a winterized sleeping bag. I might have to run fans and pop the moon roof out for summer and use your screen mesh idea! Maybe design a fantastic fan to fit in the opening?

    1. aqian Avatar

      if you build the moonroof fan thing, I would love to see it!! Your setup sounds like its going to be great, good luck!

  15. patriciagroover Avatar
    patriciagroover

    Do you sell this bed frame by any chance? Please let me know because I’m very interested Thank you

  16. patriciagroover Avatar

    Amy, can I please pay you to make the Honda Element bed for me? thanks, patricia.groover@gmail.com

    1. aqian Avatar

      Hi Patricia! I’m not currently offering this bed for sale, but these folks have made something somewhat based off of my design and ARE offering a product for sale. Maybe check them out? https://campncar.com

  17. Jason Sleight Avatar
    Jason Sleight

    Hello Amy. I’m so grateful for all this brilliant info!
    I’m thinking about making it wider. Like 42”. I figure I could extend to less than 42” and still be fine? To modify your plans, would I add about 3” to the boards for each half? Or am I overlooking something (I’m not nearly as design savvy as you)…
    Also, wondering more specifics on the type of wood and plywood used. I’m wanting best weight to strength ratio.
    Thanks!!

    1. aqian Avatar

      Hi Jason! Sorry for the late response, I’m a bit behind these days. Your plan to just lengthen the slats sounds like it should work! I used mostly ‘whitewood’ boards (that’s what they’re called at most hardware stores), which I think are mostly just pine. For plywood I just used scraps of plywood sheathing. Those are just about the cheapest lumber and plywood you can choose, and are pretty light, too. It’s possible that other types of wood would give you better strength to weight, but the price and complexity would also increase pretty quickly, too.

      1. Jason Sleight Avatar
        Jason Sleight

        No worries. Thanks for your reply!
        I used the white wood and plywood scraps. Turned out great! I made it 60.5” long and 42” wide. (24” closed). i shortened it length since I have the cooler box and wanted to be able to open it. I may make an extension piece that folds out 6-8” but so far I’m ok with feet hanging over. I’m so grateful for the plans and video you provided. This has been a crucial first step towards making my motelement camper.
        One other note, I wound up added about 1/4” to the back legs for the storage bins I bought. And I’m thinking of clever ways to hold the bed up if I need to get to the spare tire area.

  18. Kaytie Berard Avatar
    Kaytie Berard

    This is such a great build! Where did you get your mattress? Is it custom?

    1. aqian Avatar

      yes, custom. I found a 4″ thick twin mattress, then cut it to the right shape and sewed custom covers and sheets.

      1. Kaytie Berard Avatar
        Kaytie Berard

        Thank you!! I’ve already built a bench behind the front seats of mine, but I’m planning on using your idea to make a collapsible bed, just a shorter version of it. I’m inexperienced so hopefully it goes well! Thank you so much for sharing your knowledge!

        1. Kevin Shea Avatar
          Kevin Shea

          Amy, I copied the plans from the link. Is there any way you have a higher resolution version. Some of the measurements are fuzzy to read?

          Thanks again for your hard work and sharing.

          Sent from my iPhone

          >

  19. Kaytie Berard Avatar
    Kaytie Berard

    I did it!! Not nearly as nice or fluid as yours, but it works haha. I’ve never really built anything so I think I got the best outcome I could. Mine is also shorter because I had already built a bench that runs behind the front seats. But thank you again for sharing your ideas!! I can email you a picture if you care to see it!

    1. aqian Avatar

      Congratulations! That’s wonderful!!!

  20. Mark Baron Avatar
    Mark Baron

    Hey Amy, any chance that you have a template for the 3 peices of wood along the right outside of you bed? Something that I could plot out, scribe onto the wood and cut out with a jig/band saw?
    Regards 🙂

    1. aqian Avatar

      Yup, search the word ‘template’ on that article. I linked to a 1:1 printable pdf. You have to piece together several sheets of paper, but that should give you something to tape together, cut out, and trace. Good luck!

      1. Mark Baron Avatar

        Oh great, thanks Amy, I think I have access to a plotter!!

    2. Mark Baron Avatar
      Mark Baron

      Sorry ……”pieces” not peices:(

  21. micahartman Avatar

    I just built this bed. Thank you so much for the plans and cut list. It was so empowering to be abe to put it together (with a little help from friends.). i have NEVER built anything before! I can’t wait to try making the desk unit for the other side of my Element. You’re my hero!

    1. aqian Avatar

      I am THRILLED to get your message! Congrats on your build, and good luck on future ones!!!

  22. Emily Avatar
    Emily

    Hey Amy – I love your setup! I made the cabinet already, with some modifications like sliding doors, and a hinged counter extension. I am ready to start the bed but am confused a bit on the cut list. There are 23 slats that are the same width, made from 1×3’s, but on the cut list they are listed as .75×2.5…But it doesn’t look like you shave them down in the video, other than rounding the corners? 23-1×3’s add up to 69” long, without spaces or the 2 end slats, but your whole bed is only 66”. Hmm. I am a beginner at this so maybe I am missing something! I must be because I read the other comments from successful builders! ~Emily

    1. aqian Avatar

      Hi Emily, it’s great to hear about your build!!! Lumber dimensions are really misleading because they are often labeled with their rough sawn dimension. But after the board is planed, it is smaller. So a 1×3 actually measures 0.75×2.5. (A 2×4 is actually 1.5×3.5!). Best of luck on the rest of your build and let me know if you have more questions!

      1. Emily Avatar
        Emily

        Thanks Amy! Your cut list totally made sense once I got to the hardware store and saw the 1×3’s in person! Build is in progress 🙂

  23. Jason G. Avatar
    Jason G.

    Thanks Amy. I used your build, plus a friends and its looking great! i cant wait to start my cross country trip..Thanks!

    1. aqian Avatar

      That’s awesome! have a great trip!!!

  24. Sharon Avatar
    Sharon

    Hi Qian,
    I am looking to convert my Honda Element into a full-time place for myself to stay in and am so impressed by your creativity. I would love to use your design for the bed and I see that you have released them, but I do not have any skills as it relate to cutting wood and furniture building. I was wondering if you might be interested in getting paid to help me in converting my Element?

    Thanks!
    Sharon

    1. aqian Avatar

      Hi Sharon! I don’t currently do conversions for others, but perhaps you would be interested in checking out this bed, which is made for sale? It was based partially off of my design: https://campncar.com/store/ Alternatively, you could definitely give it a try building this design yourself! I’ve gotten numerous messages from folks who completed this as their first building project!

  25. djloudog Avatar
    djloudog

    Amy, do you sell these or know someone who is?

    1. aqian Avatar

      I don’t sell these, but you can check out this, which was partially based on my design https://campncar.com/store/

      1. nznancy24 Avatar

        I made one but I needed to put my seats back on and was planning on selling mine. Let me know if you are interested.

      2. nznancy24 Avatar

        Oh and mine is just the bed, I did not do the extra cut out parts. Worked really well when I was using it.

  26. Keegan Avatar
    Keegan

    How much does this cost to make?

  27. […] Honda Element Camper – Bed […]

  28. Ophelia Avatar
    Ophelia

    Thanks so much for sharing this! I made this based on your plans and have some details to share with others that helped me.

    I bought 9-1x3s, 1-1×4, and 1-2×4. I ended up making my spaces 0.25 inches between some slats, and then 0.25 inches plus a piece of cardboard for the outer slats. I ended up shaving off about a half an inch from each end since my rear door wouldn’t close all the way (I have a 2008 Element). I also trimmed the outer back leg by 2 inches to accommodate the odd shape of the floor.

    I raised the legs a bit to fit a Rubbermaid 14 gallon Brute tub, but had to switch out one of the 2×4 legs for a 1×4 instead to accommodate the 17 inch width needed for the bin.

    Otherwise, this was so cool. Thank you so much for sharing your plans!

    1. aqian Avatar

      So cool, Ophelia! Congrats on your build, I’m glad they helped you!

  29. Joyce Bruett Avatar
    Joyce Bruett

    Some of my amazing staff used your plans to make the bed for my Element as their final project in wood shop for high school. It turned out great and I can’t wait to finish out the rest of the projects inside so I can take her out camping now!

    1. aqian Avatar

      Hi Joyce, Thank you for letting me know about your Element build – it brings me great joy! Happy camping!

  30. Jonathan Avatar
    Jonathan

    This might be a silly question, but does anyone (or Amy?) know what the rough weight of the expanding slat bed is? I’m looking into different methods of bed-building for the Element and am trying to minimize the weight added.
    Thanks!

  31. Xavier Avatar
    Xavier

    Hi Amy,

    Just spent the weekend building this bed and it turned out great. Thank you for the extremely detailed plans — it made the process a breeze!

    I have some questions about your approach to cutting the mattress.
    – Do you “need” the shelf on the lefthand side to compress the two smaller pieces against the larger one so that they don’t slide?
    – Do you experience the individual sections moving much with respect to one another? When lying on the center of the bed, do you sink much into the spot where the mattress is cut?
    – Do you think there are any better ways to go about cutting the mattress, as opposed to a single perpendicular cut? I’m guessing that a slightly diagonal cut with some velcro might hold the individual pieces together a bit better.

    Anyway, I might be overthinking this. I only have one mattress and want to get it right.

    Thank you!

Leave a Reply